While searching macros, one thing I've noticed is that some people tend to make macros more complicated than necessary. In my experience, the cleaner the code, the more efficient it runs. Granted, I am by no means an expert in creating macros. I have a lot to learn; however, I'm learning.
I recently needed a macro to resize a selected image to 75 percent of its original size. Unfortunately, the "Record Macro" feature was not working as expected, so off I went to Mister Google.
After searching several sites, I came across a solution, but needed to modify it a touch to make it work efficiently. Here is the end result:
Sub Image_75_Percent()
'
' Resize the selected image to 75 percent of its original size.
'
Dim PecentSize As Integer
PercentSize = 75
Selection.InlineShapes(1).ScaleHeight = PercentSize
Selection.InlineShapes(1).ScaleWidth = PercentSize
End Sub
Copy and paste this into a new macro named "Image_75_Percent." Then select an image and run the macro. Since you scaled the height and width 75 percent, the aspect ratio will be maintained.
Cheers!
Christel
Monday, August 3, 2015

Friday, July 31, 2015
Display more than three views in SharePoint 2013 library or list
A few weeks back, a coworker asked me to expand the number of views shown in a SharePoint list. SharePoint shows only the first three view links by default, but includes ellipses (three dots) to expand the selection of views available (as shown below).

But as usual, I hate giving the "It's not possible" answer, so I started to dig into the issue and see if someone had a solution. Lo and behold, someone had! Thanks to Aveenav who posted the answer on SharePoint StackExchange.
If you're familiar with SharePoint 2013, implementing the solution is relatively straightforward. However, I've included instructions below to help the rest of us out.
1. Go to the list or library where you want to see additional views.
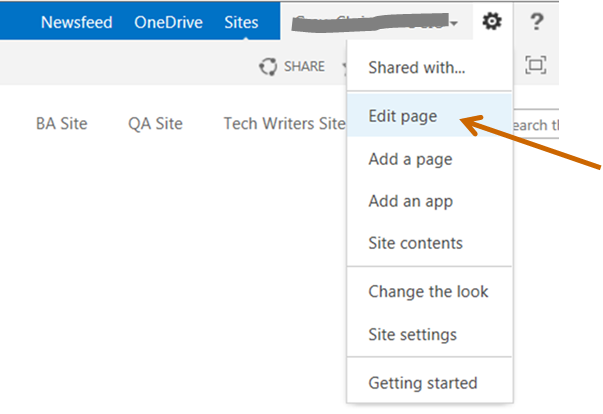
2. In the upper right corner of the page, click the cog and select Edit Page.

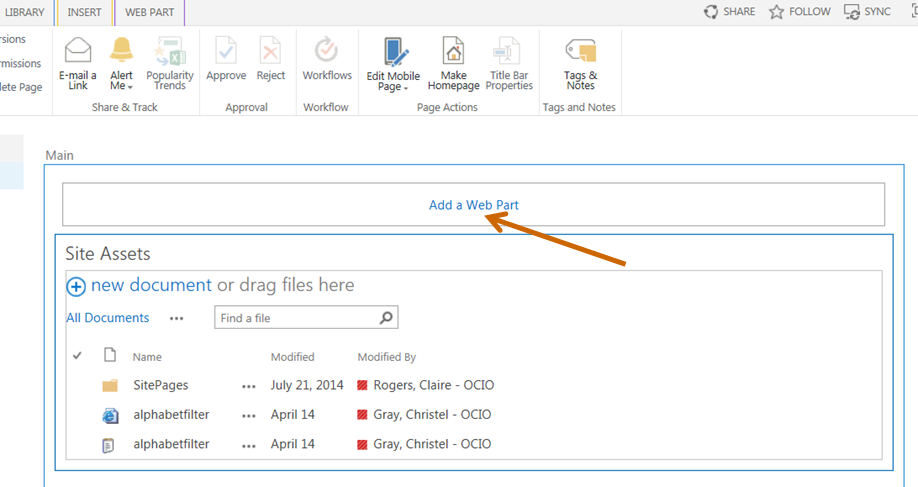
3. Click Add a Web Part in the main window area.

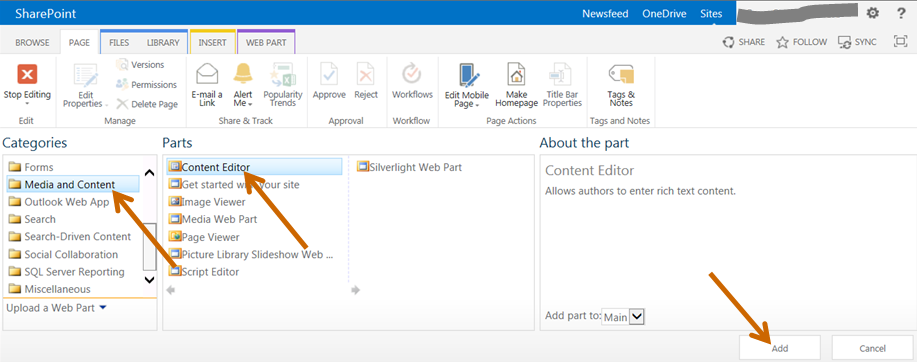
4. In the webpart Categories, scroll down and select Media and Content. Select Script Editor and click Add.


6. In the Embed window, paste this code.
7. The "4" in the script above determines how many view selections to show. Change this number as needed. Click Insert on the Embed window.


I had heard that it wasn't possible to change this setting, so I informed my co-worker, unfortunately, we can't do anything about it.
But as usual, I hate giving the "It's not possible" answer, so I started to dig into the issue and see if someone had a solution. Lo and behold, someone had! Thanks to Aveenav who posted the answer on SharePoint StackExchange.
If you're familiar with SharePoint 2013, implementing the solution is relatively straightforward. However, I've included instructions below to help the rest of us out.
1. Go to the list or library where you want to see additional views.
2. In the upper right corner of the page, click the cog and select Edit Page.

3. Click Add a Web Part in the main window area.
5. In the Script Editor, click Edit Snippet.
<script type="text/javascript">
ExecuteOrDelayUntilScriptLoaded(overrideSurfacePivotCount, 'clienttemplates.js');

function overrideSurfacePivotCount() {
   ClientPivotControl.prototype.SurfacedPivotCount = 4;
};
</script>
7. The "4" in the script above determines how many view selections to show. Change this number as needed. Click Insert on the Embed window.

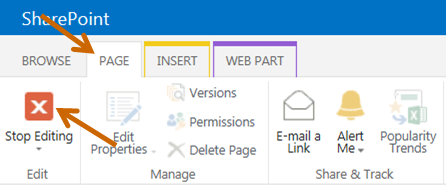
8. Click Stop Editing in the upper left of the SharePoint ribbon.

9. Test the views.

I've increased the number of view selections available to 15 and encountered no issues. If the views are extended to the point of going beyond the width of the page, the view selections will wrap to the next line.
Hopefully, this procedure will be handy for you if you get a similar request.
Friday, July 17, 2015
Displaying Images in Excel Based on a Result
If you've worked with me at all, you know that I'm always looking for ways to do things smarter, faster, and more efficient. I recently was challenged with developing a visual status report for a project, and the project manager wanted to use specific icons. Though Excel has a decent selection of icons to use for conditional formatting, the request for specific icons created a challenge for me. Thankfully, I found the following tip from Allen Wyatt. Though the set-up is involved, the time saved will be priceless.
Below is the beginning of my efforts using custom icons.

Wednesday, June 17, 2015
Metadata and Managed Metadata Service
With my ever growing SharePoint role, I find the need to get thorough and more detailed information about SharePoint features. My most recent task required to me learn more about SharePoint 2010 Managed Metadata Service. At the beginning of the year, I learned about Managed Metadata, so I feel I have a good grasp of this feature. Now, I needed to learned about the Managed Metadata Service to further help my client.
Thankfully, my search did not take too long to discover a great, thorough resource for this feature. I highly recommend watching Ty Anderson's video about using SharePoint 2010 Managed Metadata Service.
https://technet.microsoft.com/en-us/video/use-the-sharepoint-2010-managed-metadata-service.aspx
Thankfully, my search did not take too long to discover a great, thorough resource for this feature. I highly recommend watching Ty Anderson's video about using SharePoint 2010 Managed Metadata Service.
https://technet.microsoft.com/en-us/video/use-the-sharepoint-2010-managed-metadata-service.aspx
Tuesday, April 21, 2015
Alphabetical List Quick Filter Solution
The goal of this solution is to create an alphabetical filter at the top of a SharePoint list. Using this filter, we can click a letter and the list will be filtered by the first letter of the column on which the filter is applied.

As typical in SharePoint, there is usually more than one way to solve an issue. The first way to create an A-Z quick filter is to "hard wire" the solution based on views created when you manually filter a column. For more information on how to do this, refer to:
- SharePoint StackExchange's solution: Page a list via A-Z
- The Salty PC's solution: Create an A-Z quick filter web part
However, JavaScript is the more versatile solution. The plus side of using JavaScript is that you can re-use this code on any site and any list without rewriting the code.
The solution below is applicable to SharePoint 2010 and 2013, but can be applied to SharePoint 2007 using the code at Alphabetical List View Quick Filter by Boris Gomiunik. If you view Gomiunik's site, he goes into the nitty gritty details of the javascript, so I won't repeat his actions, as he does a great job explaining it!
This post provides the instructions on how to implement the solution.
- Create your SharePoint list.
- Open Notepad, copy the code below, and paste it into a new file. (Thanks to Aleksandr for updating the code to SharePoint 2010/2013 requirements, as posted on PasteBin at Nilldot: SharePoint list alphabetic order.)
- Save this file as .txt and upload it to the Site Assets library on the site where your list is saved. You may have to click Site Contents on the quick launch menu on the left to see the Site Assets library.
- Right click on the file now on SharePoint, and click Copy shortcut to get the URL of the file.
- On the page of the list you credit in Step 1, click the cog in the upper-right corner of the page, and click Edit page.
- Click Add a Web Part.
- In the Categories window, click Media and Content. Select Content Editor, and click Add.
- Click the drop-down arrow on the new Content Editor Web Part and select Edit Web Part.
- In the Content Editor properties box, paste the URL for the *.txt file you copied in Step 3 in the Content Link field. Click Test Link to ensure the *.txt file opens. Click OK.
- Click the Page tab and click Stop Editing.
- Activate the list menu by clicking somewhere in the list area (below the Content Editor Web Part, but not on a list link).
- Click the List tab, and List Settings.
- Under the Columns section, click Create column.
- Name the column FL (this is linked to the code line var filterField = "FL" above and stands for first letter). For the Column type, select Calculated (calculation based on other columns). In the Formula field, type =LEFT and double click the column name (in the Insert Column box) from which you want to grab the first letter. Add parentheses around the outside of the column name brackets, and remove the brackets. Click OK.
For instance, in this example, I want to filter by the first letter of the Term column, so my formula looks like this: - Go back to the list page and test your alphabetical quick filter links!
- <script type="text/javascript">
- function qs(paramName) {
- var args = document.location.search.substring(1).split("&");
- for(j = 0; j < args.length; j++) {
- nameValues = args[j].split("=");
- if(nameValues[0] == paramName) return nameValues[1];
- }
- return null;
- }
- var filterField = "FL";
- var filterValuesDelimiter = " - ";
- var filterValues = new Array
- ("A","B","C","D","E","F","G","H","I","J","K","L","M","N","O","P","Q","R","S","T","U","V","W","X","Y","Z");
- var selectedValueStyle = "font-weight: bold;";
- var filterDivStyle = "margin: 5px; font-size: 15px;";
- var filterLinks = new Array();
- for (var i = 0; i < filterValues.length; i++) {
- filterLinks.push('<a ' + (qs("FilterValue1") == filterValues[i] ? 'style="' + selectedValueStyle + ' ' : '') + 'href="' + document.location.pathname + '?FilterField1=' +
- filterField + '&FilterValue1=' + filterValues[i] + '">' + filterValues[i] + '</a>');
- }
- document.write('<div style="' + filterDivStyle + '">' + filterLinks.join
- (filterValuesDelimiter) + '</div>');
- </script>





Subscribe to:
Posts (Atom)